Creating a Mac bootable USB drive on a Windows PC may seem tricky but it’s completely possible with the right steps and tools. In this guide, I’ll show you How to Create Mac OS Bootable USB on Windows for any macOS version, from older Mac OS X editions like Mountain Lion to the latest macOS Ventura. It’s perfect for anyone who wants to reinstall macOS or upgrade their Mac without using another Mac computer.
How to Create Mac OS Bootable USB on Windows
Before we start, make sure you have the following:
-
USB Drive – 8GB or more recommended
-
macOS Installer – Old or new version
-
Third-party software:
-
HSF Plus for Windows (trial version works fine)
-
TransMac (trial version works fine)
-
-
Windows PC
Tip: Always backup important data from your USB drive. The process will erase all files on it.
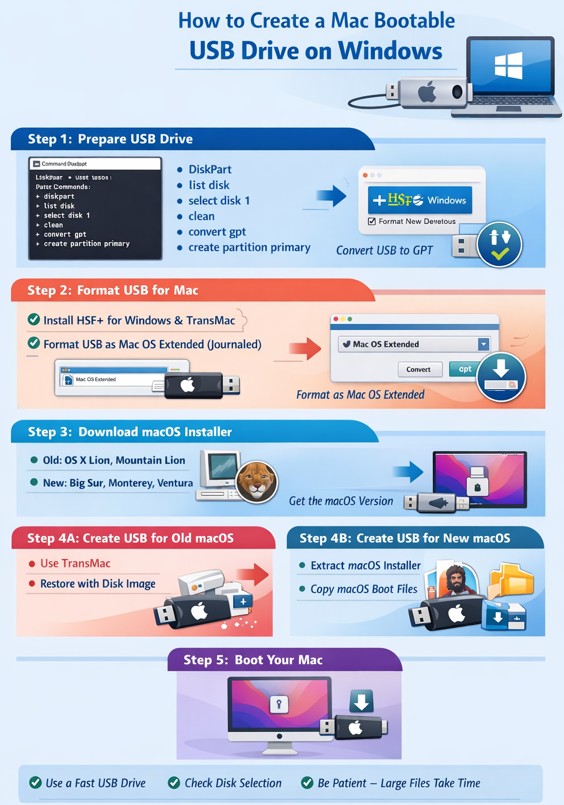
Step 1: Prepare Your USB Drive
-
Plug in your USB drive to your computer.
-
Open Command Prompt as an administrator.
-
Type the following commands step by step:
This shows all connected drives. Identify your USB drive (for example, Disk 1).
-
Select the USB drive:
-
Clean the drive:
-
Convert the USB to GPT partition scheme:
-
Create a primary partition:
-
Exit DiskPart:
- At this point, your USB is ready for macOS installation.
Step 2: Format the USB Drive for macOS
Next, we need to format the USB in Mac OS Extended (Journaled):
-
Install HSF Plus for Windows and TransMac. Restart your PC after installation.
-
Open HSF Plus for Windows.
-
Click the three dots (
…) ? Format New Volume. -
Select your USB drive. Optionally, give it a name.
-
Click Format.
Your USB drive is now formatted correctly, and the partition style is GPT.
Suggested Screenshot: Show HSF Plus formatting menu with USB selected.
Step 3: Download Your macOS Installer
You’ll need the macOS version you want to install:
-
Old macOS versions: Mac OS X Tiger, Lion, Mountain Lion
-
New macOS versions: High Sierra, Catalina, Big Sur, Monterey, Ventura
Tip: Make sure the installer is complete and offline for a smooth process.
Step 4: Create Bootable USB for Old macOS Versions
-
Open TransMac as an administrator.
-
Right-click your USB drive ? Restore with Disk Image ? Click Yes.
-
Browse and select the macOS installer (e.g., Mac OS X Mountain Lion) ? Click Open ? Click OK ? Click Yes to start.
The restoration may take some time depending on your hardware.
Booting your Mac:
-
Insert the USB drive.
-
Press the power button, then immediately hold Option (?) key.
-
Select your USB drive from the boot menu.
Your Mac will boot from the USB, ready for installation.
![]()
Step 5: Create Bootable USB for New macOS Versions
For macOS High Sierra, Catalina, Big Sur, Monterey, or Ventura:
-
Convert the USB to GPT and format it in Mac OS Extended (Journaled).
-
Open the macOS DMG installer in TransMac.
-
Extract the
.appinstaller to your desktop by dragging it out of the DMG. -
Open HSF Plus, then copy the extracted macOS installer to your USB drive.
? Depending on your USB and PC speed, this may take some time.
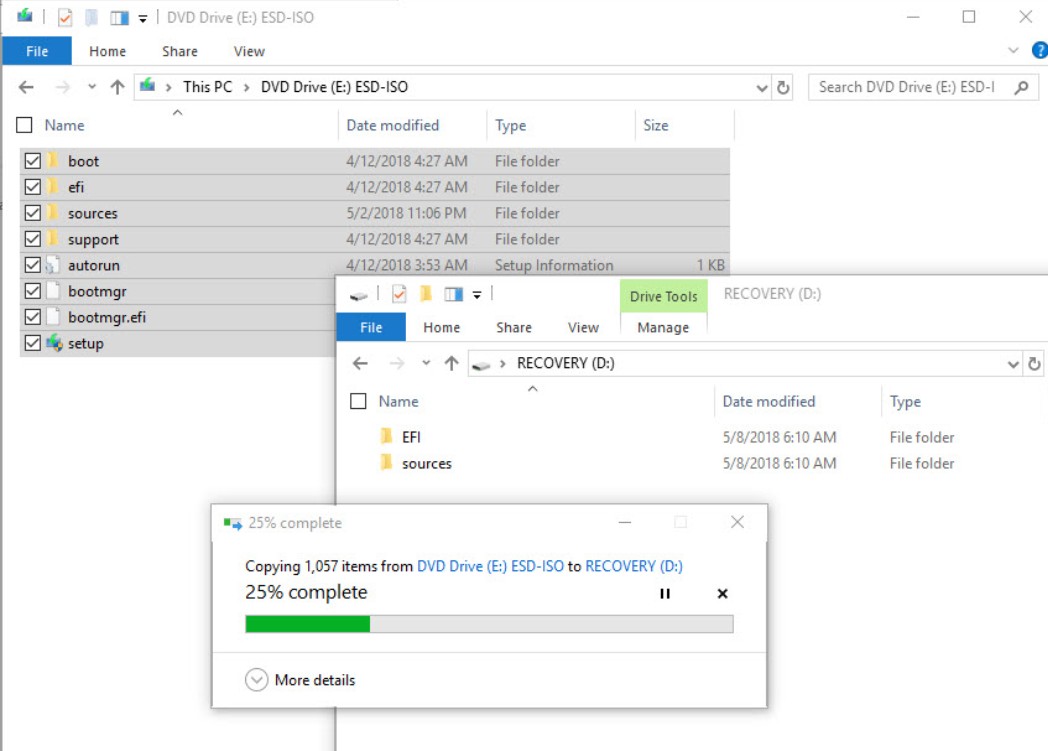
Add the Boot Files
Each macOS version requires specific boot files:
-
Download the corresponding macOS boot files from the provided link (Google Drive in the video description).
-
Extract the folder ? Enable hidden items in Windows Explorer ? Copy all files to your USB drive.
Now your macOS Ventura bootable USB (or any version) is ready to use!
Tips for a Smooth Process
-
Use a fast USB 3.0 drive to reduce installation time.
-
Ensure your Windows PC has enough free space and stable power.
-
Double-check you selected the correct disk in DiskPart to avoid wiping the wrong drive.
-
Patience is key: extracting DMG installers and copying files can take 20–60 minutes depending on your hardware.
Final Thoughts
Creating a Mac bootable USB on Windows is now straightforward. Whether it’s an old Mac OS X or the latest macOS, following this guide guarantees a fully functional bootable drive.
With this USB, you can reinstall or upgrade macOS anytime, without another Mac.